• Skip to main content
Jennifer Andrew

Jennifer Andrew

scalloped circle buttonemail me!

diy

10 Camping DIY Projects to Try This Summer

07/13/2015 by Jennifer 1 Comment

This year I am having pretty significant camping withdrawals. When I was younger, I used to go camping every year in my favorite California redwoods. Now that I’m older and have transportation and friends who like camping, you’d think it would be easier to take a trip to the great outdoors. But it’s actually quite the opposite! One of my biggest goals this year is to go camping, even if it’s a short trip. I just want trees and a fire and a tent and a small body of water. It’s gonna happen. :)

In honor of my favorite summer tradition, I thought I would round up some camping DIY projects I want to try asap:

10 Camping DIY Projects to Try This Summer

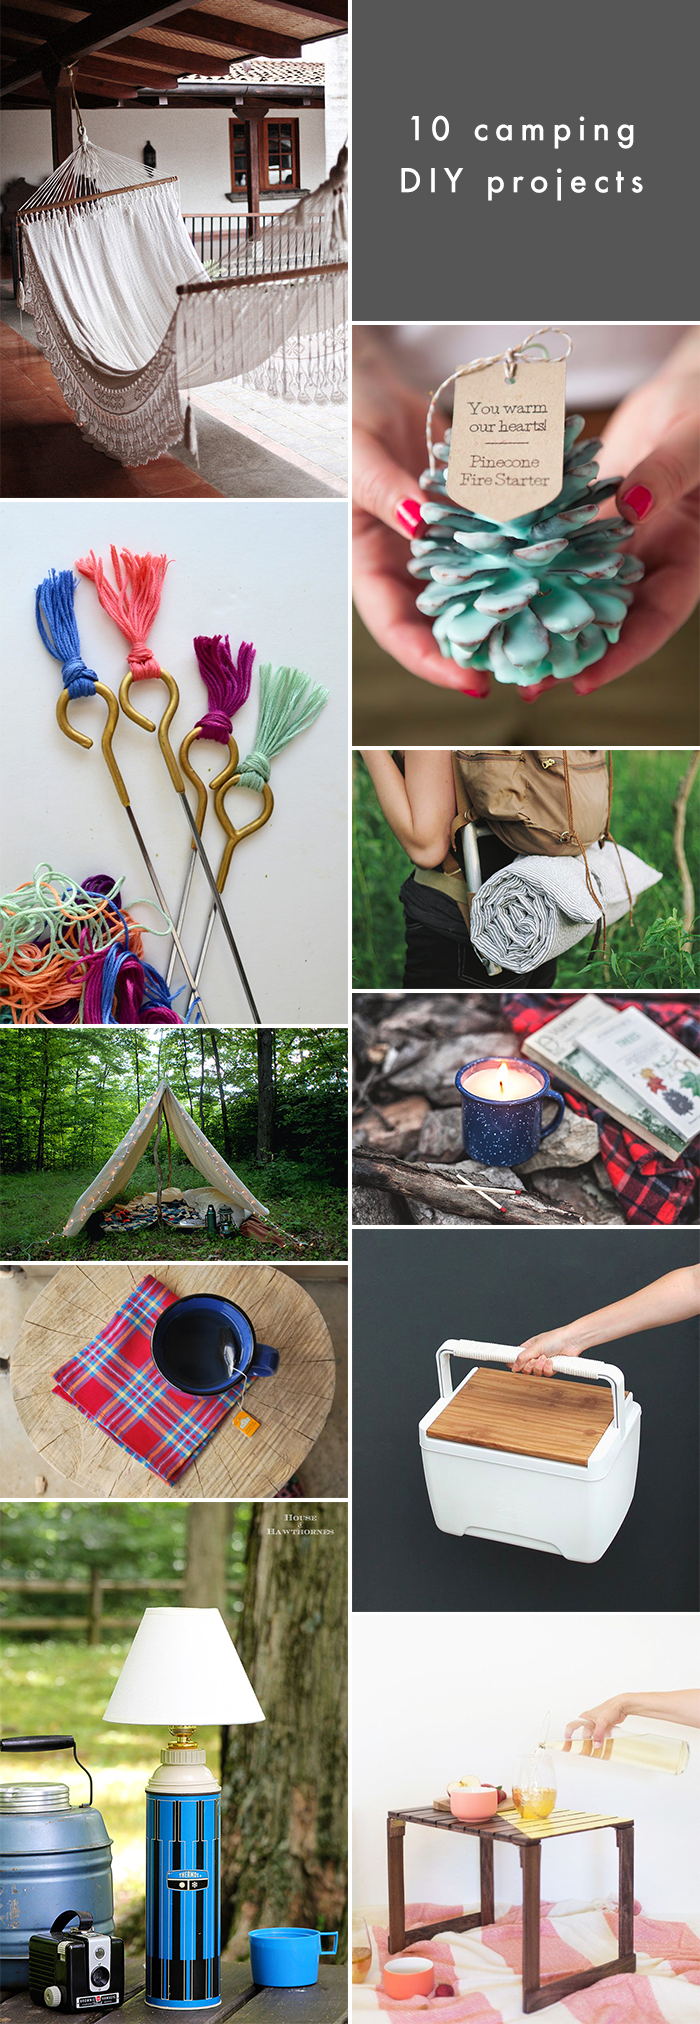
(top left, counter clockwise)

1. DIY Homemade Hammock | Pop Sugar
2. Tasseled Roasting Sticks | Twine & Table
3. DIY Canvas Tent | The Merry Thought
4. DIY Flannel Napkins | Hey Wanderer
5. DIY Thermos Lamp | House of Hawthornes
6. DIY Mini Picnic Tables | Lovely Indeed
7. DIY Modern and Very Cool Cooler | Almost Makes Perfect
8. DIY Camp Mug Candle | Popptalk
9. DIY Sleeping Pad | The Merry Thought
10. DIY Pinecone Fire Starter Favors | Something Turquoise

Aren’t these amazing? I love the hammock but I don’t think I’m savvy enough with a sewing machine to make it happen. Maybe I’ll go for the modern cooler.

Do you have any plans to go camping or participate in camping DIY projects this summer? If anyone has Oregon coast camping recommendations, let me know!

Filed Under: crafts, diy

Happy Halloween + Pumpkin DIY Projects

10/31/2014 by Jennifer 4 Comments

Happy Halloween! This is always one of those last minute holidays for me. I’m not sure if I will do anything to celebrate tonight, but I am dressing up as Shoshanna from Girls for the day. I’ve been planning this costume for a year. Basically, I’m just wearing a crazy bun on the side of my head and talking real fast as usual. Whew! So labor intensive. I have so much appreciation for people who put time and effort into their costumes though. My little sister dressed up as a vending machine this year and made the costume with my dad which I think is so sweet. I’m also loving costumes around the interwebs such as this Pinocchio family costume. So good!

I’m not a fan of scary Halloween decor, but I do love cute autumn swag more than anything. So I thought I would share some of the best pumpkin DIY projects I’ve found over the past few weeks! I love that pumpkins are relevant for the entire season. Pumpkin crafts forever.

Cute Pumpkin Crafts

(top left, clockwise)

1. DIY Macrame Hanging Pumpkin | Fall for DIY
2. Decoupage Pumpkins | Brit + Co
3. DIY Pumpkin Scented Candles | Momtastic
4. Felt Costumes for Your Halloween Pumpkins | Lia Griffith

Are you dressing up this year? Doing anything crafty? Have a fun and safe night!

Filed Under: crafts, diy

Carve-A-Stamp Kit from Uncommon Goods

10/22/2014 by Jennifer 6 Comments

Good morning! Today I’m back to talk about another product from the beautifully curated online shop Uncommon Goods. Before learning about custom stamps and heat embossing, I never really gave stamping a second thought. I associated stamps with crafty handmade stationery and that was the end of it. But I’ve since realized that stamps have so many different purposes and are 100% customizable. This past weekend, I finally tried making my own stamps using this Carve-a-Stamp kit by Yellow Owl from Uncommon Goods. Like the Calligraphy Starter Kit I shared last week, this was a trial-and-error experience and I have a few tips for those of you who are considering trying it out too.

Carve-a-Stamp Kit from Uncommon Goods | Earl Grey Blog

This kit contained everything I needed to get started, including templates for tons of cute designs. I decided to make one stamp from a template and another stamp of my teacup logo.

Carve-a-Stamp Kit from Uncommon Goods | Earl Grey BlogCarve-a-Stamp Kit from Uncommon Goods | Earl Grey Blog Carve-a-Stamp Kit from Uncommon Goods | Earl Grey Blog

I traced the cute envelope illustration, transferred it to the rubber stamp block, and then things began to go wrong. This kit includes five different carving tool sizes. It’s important to start with the smallest one and trace lightly. I didn’t do that. I took the small carving tool and started carving out the lines like a beast! Whoops! Tracing lightly is the key to getting those smooth lines.

Carve-a-Stamp Kit from Uncommon Goods | Earl Grey Blog

As you can see, my heart envelope stamp didn’t exactly turn out as planned. Lesson learned! I used this failed stamp carving experience to create a more clean stamp on the back of the rubber block.

Carve-a-Stamp Kit from Uncommon Goods | Earl Grey Blog

Creating a stamp of my teacup logo has been on my to-do list for a long time! I’m happy that I was able to make it happen with this stamp kit. To add a little shine, I decided to heat emboss using this teacup stamp. I love how the gold turned out!

Heat Embossed Teacups | Earl Grey Blog

Regardless of the ups and downs of my first attempt at carving stamps, I am so excited to make many more! I have one or two extra carving blocks on hand, so I’ll continue using the tools provided in this helpful kit. And I’m definitely going to retrace the heart envelope. :)

As I said last week, I have nothing but nice things to say about Uncommon Goods. This company is so ethically sound and dedicated to supporting designers, artists, and their own community. When it comes to finding special gifts for friends and family, Uncommon Goods has something for everyone. You can find gifts for women here, gifts for men here, and gifts for kids here. The options are never ending!

Thanks for letting me share! Have you made your own stamps before? Or have you tried heat embossing?

Filed Under: crafts, diy

Calligraphy Starter Kit from Uncommon Goods

10/13/2014 by Jennifer 5 Comments

Modern calligraphy is such a common thing in Blogland. Everywhere you look, everywhere you go… there’s calligraphy. I’ve gone into shops looking for calligraphy kits before, but most of them taught the old school western style. Over the weekend, however, I had the chance to try out an amazing Calligraphy Starter Kit by Diva Pyari from Uncommon Goods.

calligraphy-kit_01

Uncommon Goods is a privately owned company based in Brooklyn, New York that specializes in providing creative and handcrafted gifts for all types of people. What I love most about them is that they are very socially and environmentally aware. Most products are made in the United States and about half are made by hand. Uncommon Goods partners with four non-profits and even reaches out to the community, hosting product design and art challenges. And I could go on… I’m loving everything I’ve learned about them so far! Finding out about retailers that care for the earth and humanity gives me so much hope.

Calligraphy Starter Kit

So, about this Calligraphy Starter Kit. I was really nervous that I would try it out and fail and not be able to blog about it. But it wasn’t so bad! I mean, it was really bad at first but I slowly started to get the hang of it. It turned out to be really addicting! I am already planning to go out and buy some different supplies (colorful ink perhaps!).

In the spirit of keeping it real, here is my first attempt at writing some letters. Yikes.

Calligraphy Starter Kit

I experimented with different ways of holding the pen before I was comfortable with it. The instructions advised to hold the nib over a flame for a few seconds and that made a huge difference in the inkflow. This next picture is still a little rough but better right? Pretty sure modern calligraphy is allowed to be messy. :)

calligraphy-kit_05Calligraphy Starter Kit

If you’re looking for gifts for friends, family, or yourself (treat yo’self!), Uncommon Goods has a plethora of unique choices. Here is the calligraphy kit if you’re interested. You can also check out the gifts for women here and gifts for men here. Oh and there are tons of cute gifts for little ones here! I’m a true fan. I’ll be back next week with another review of their products because I couldn’t stop with just one.

Have you done any calligraphy? Any suggestions on fancy ink or nib brands?

Filed Under: crafts, diy

DIY Minimal Brass Jewelry Hanger

09/29/2014 by Jennifer 12 Comments

My favorite DIY projects are those that are functional, and I most definitely needed something to hang up my necklaces. As a self-proclaimed non-accessorizer, I don’t think about wearing jewelry often. This handy brass jewelry hanger will hopefully remind me of the necklaces I do have.

DIY Minimal Brass Jewelry Hanger

This is really the simplest project if you start with the right supplies. I ended up doing quite a bit of experimenting.

DIY Minimal Brass Jewelry Hanger

Supplies needed: a brass tube, rope, s-hooks (I recommend buying more than 5 to balance things out), scissors
May be needed: Pliers, wrench, crochet thread

I found most of my supplies at Ace Hardware.

DIY Minimal Brass Jewelry Hanger

First things first – open up those s-hooks! To make things easier, you might want to choose open s-hooks to begin with. I was really set on this brass color (rather than steel), so I used pliers and a wrench to turns these 8’s into S’s.

DIY Minimal Brass Jewelry Hanger

The next step is to feed the rope through the brass tube. Unless you have really tiny rope, it might be hard to feed it all the way through. I decided to pull crochet thread through the tube first, tightly tying my thread to the end of the rope.

DIY Minimal Brass Jewelry Hanger

Cut and tie your rope together at whichever length you’d like. Loop your s-hooks onto the pole and hang up your beautiful jewelry for the whole wide world (or just you) to see!

DIY Jewelry Hanger | Earl Grey Blog

Hope you enjoyed this project! Do you have any fancy ways of displaying your jewelry?


PS – don’t pass up the chance to win some cozy fall accessories! Enter my “Happy Fall” giveaway here.

Filed Under: crafts, diy

DIY Watercolor Confetti

09/15/2014 by Jennifer 9 Comments

I’ve been on a huge watercolor kick lately! My favorite craft techniques are those that don’t require precision. I can’t draw or paint anything realistic, but I can swoosh paint around like nobody’s business. Recently, I made some quick watercolor confetti because I believe it’s always a smart idea to have a little on hand. You never know when you’ll decide to have an impromptu festive moment.

DIY Watercolor Confetti | Earl Grey Blog

Supplies: watercolor paints, assorted paint brushes and craft/hole punches (of different sizes and shapes if you’d like). All of my supplies were purchased from Michael’s.

DIY Watercolor Confetti | Earl Grey BlogDIY Watercolor Confetti | Earl Grey Blog

First, dilute your paint and fill a sheet of watercolor paper with messy brush strokes. Then punch out several shapes.

DIY Watercolor Confetti | Earl Grey Blog DIY Watercolor Confetti | Earl Grey Blog

Store your confetti in little envelopes. Or throw it in the air. Or throw it at a friend. Have a party. Love life. Etc. :)

Filed Under: crafts, diy

  • Page 1
  • Page 2
  • Page 3
  • Interim pages omitted …
  • Page 7
  • Go to Next Page »
get in touch